 |
PLEASE PATRONIZE OUR SPONSORS!


|
|||||||
 |
|
|
Thread Tools | Display Modes |
|
#31
|
||||
|
||||
|
TheSaturnV,
Glad to see your back on the 147 project. On the wiring I would recommend that you pay the money and buy the wiring. I spent a lot of money and time building two of them. Hard time finding all the colors and sizes of wire and the connections are not cheap. Routing and lengths will drive you to drink too. On the mower wheels I was going to move mine outboard farther, but putting them in the center is a good idea I have a 73 with 38 inch deck and they are in the center. I did move the ones on my 127 out father. Not a huge project. Looking forward to following your restoration. I like the 147R that I completed last fall. Regards, Chris
__________________
Casbohm Maple and Honey www.mapleandhoney.com Cubs: 147R and the "train", 127 elec lift, 127, 125, 106, 102, 100, 86, 73, Brinly plow, Snow thrower, 2 Rototillers, several mower decks and several snow plows, #1 cart, Grandkids barrel cart. |
|
#32
|
||||
|
||||
|
After looking on the parts-smart look up it appears as if the 42 inch stamped metal deck did not have the caster option for the 147, only the castiron ends deck had the casters from what I can tell.
|
|
#33
|
||||
|
||||
|
Thanks guys.
Sugarmaker, I hope my 147 turns out as nice as yours. The main reason I want the wheels on is to be able to tilt it up and roll it around, those suckers are heavy. I'll see if that works with the wheels moved inboard. Not an issue I'll have to mess with until later this summer. lonnyb, thanks for looking that up. Sometimes I forget how much info you can get off those parts lookup sites. 
|
|
#34
|
||||
|
||||
|
I'm glad I took the good advice and replaced the wiring harness with the reproduction. High quality materials and workmanship. I spent some time learning the ins and outs of the starter generators, and found that the 122 I bought had the version with bearings on each end of the armature, and the one on the 147 had the rear bushing. On the latter, the rear shaft was beginning to score because the oil wick had run dry. I used the refurbish kits available on ePay to replace the bushing (what a job), bearing and the post studs. I did some swapping around, and the result is the 147 gets the dual-bearing case/armature with new brushes and posts. Worked out great.
With my multimeter, tests done using the 122 were showing right around 13.75 for both S/Gs. However, when I mounted the rebuilt one to the 147 the test showed about 2.00!  Consulting the materials I have, the simple conclusion of one source is the voltage regulator is bad. Bummer, $85 bucks. Consulting the materials I have, the simple conclusion of one source is the voltage regulator is bad. Bummer, $85 bucks.Don't throw out those V/R's just yet boys, check your service manuals. These things need to be cleaned and adjusted periodically and it's not that difficult to do. Looking back, the manual was perfectly clear on how this is done, but at first it was a little confusing until I learned the mechanism names. Below is a shot of the work I did and the first test had the output at 14.75. I believe it should be down at 14.25, so I have to look into that further when I set the current-voltage regulator (mechanism on top in photo). I'll do a separate diagram on it. Hope this helps someone, sometimes the small drawings in the manuals are just a little hard to decipher. Remember to use a fine file and not emery cloth or sandpaper, you want as clean a surface as possible on the points. One final note: Screw "B" in the photo was positioned wrong when I first opened the V/R up. The silver tab was below the head and riding on the screw threads, rather than sitting on top of the head as is set correctly in the photo. Check yours, I suspect someone monkeyed with it and backed it out too far (it is reverse thread). 
|
|
#35
|
|||
|
|||
|
Awesome pic with how to guide imprinted on it!
Thank you! |
|
#36
|
||||
|
||||
|
Thanks for the info, we appreciate the time, you took to share it!
__________________
Allen Proud owner of my Original and 126! My Grandpa's Cart Craftsman Lawn Sweeper Craftsman Plug Aerator |
|
#37
|
||||
|
||||
|
SaturnV
Very nice picture and documentation in the VR tuning methods. Yea dont throw these away they may be able to be adjusted and serviced. I have a old one on the 147R that was in the throw away pile and brought back to life with some TLC. (I did ruin 2 new ones some how  ) Will be watching the restoration work on your 147! ) Will be watching the restoration work on your 147!Regards, Chris
__________________
Casbohm Maple and Honey www.mapleandhoney.com Cubs: 147R and the "train", 127 elec lift, 127, 125, 106, 102, 100, 86, 73, Brinly plow, Snow thrower, 2 Rototillers, several mower decks and several snow plows, #1 cart, Grandkids barrel cart. |
|
#38
|
||||
|
||||
|
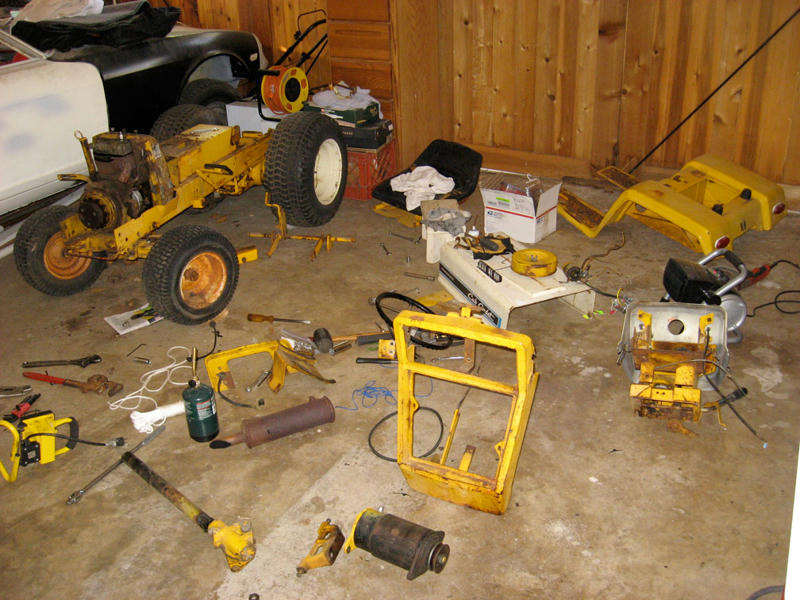
Okay gang, last night I had some good shop time and the carnage ensued. As rusty as some of the hardware looks, everything really came off easily. In most cases by hand once the initial torque was broken. That is a stark contrast to my Sears Suburban in that every nut and bolt fought me for every thread.
The most challenging part was releasing the steering wheel and hydro control lever. I tried the method of loosening the steering wheel nut to the top of the shaft, then striking it with a hammer (bottom of steering box completely released from tractor). It worked for a friend of mine, but all I got was a few stripped threads. At least I think that's what happened. After that I tried various punches with the hammer, taking care not to deform the top of the shaft. Nothing. Then I got out my makeshift Coleman torch and applied heat for just a minute or so. Worked like a champ, letting loose on the very next tap. Just needed a slight amount of heat. What hasn't budged, is the PTO. Set screws are firmly entrenched. Overall I'm really please with how easy this thing came apart. The steering box was already loose on the frame, so I suspect once I've refurbished the worm drive, done the bearing upgrade and reinstalled it properly, it should work very well. Also, the mystery of the very stiff hydro control lever was solved when I released tension on the main nut. Just a quarter turn allowed the lever to move very easily. Don't let the wreckage fool you, I went methodically and took the time to label all the hardware with instructions and into bags. Forward! \       
|
|
#39
|
|||
|
|||
|
Looking great and good way to keep up with your nuts and bolts!
|
|
#40
|
||||
|
||||
|
You've been busy! Thanks for the progress pics.
__________________
Allen Proud owner of my Original and 126! My Grandpa's Cart Craftsman Lawn Sweeper Craftsman Plug Aerator |
 |
|
|
Cub Cadet is a premium line of outdoor power equipment, established in 1961 as part of International Harvester. During the 1960s, IH initiated an entirely new line of lawn and garden equipment aimed at the owners rural homes with large yards and private gardens. There were a wide variety of Cub Cadet branded and after-market attachments available; including mowers, blades, snow blowers, front loaders, plows, carts, etc. Cub Cadet advertising at that time harped on their thorough testing by "boys - acknowledged by many as the world's worst destructive force!". Cub Cadets became known for their dependability and rugged construction.
MTD Products, Inc. of Cleveland, Ohio purchased the Cub Cadet brand from International Harvester in 1981. Cub Cadet was held as a wholly owned subsidiary for many years following this acquisition, which allowed them to operate independently. Recently, MTD has taken a more aggressive role and integrated Cub Cadet into its other lines of power equipment.
This website and forum are not affiliated with or sponsored by MTD Products Inc, which owns the CUB CADET trademarks. It is not an official MTD Products Inc, website, and MTD Products Inc, is not responsible for any of its content. The official MTD Products Inc, website can be found at: http://www.mtdproducts.com. The information and opinions expressed on this website are the responsibility of the website's owner and/or it's members, and do not represent the opinions of MTD Products Inc. IH, INTERNATIONAL HARVESTER are registered trademark of CNH America LLC
All material, images, and graphics from this site are the property of www.onlycubcadets.net. Any unauthorized use, reproductions, or duplications are prohibited unless solely expressed in writing.
Cub Cadet, Cub, Cadet, IH, MTD, Parts, Tractors, Tractor, International Harvester, Lawn, Garden, Lawn Mower, Kohler, garden tractor equipment, lawn garden tractors, antique garden tractors, garden tractor, PTO, parts, online, Original, 70, 71, 72, 73, 76, SO76, 80, 81, 86, 100, 102, 104, 105, 106, 107, 108,109, 122, 123, 124, 125, 126, 127, 128, 129, 147, 149, 169, 182, 282, 382, 482, 580, 582, 582 Special, 680, 682, 782, 782D, 784, 800, 805, 882, 982, 984, 986, 1000, 1015, 1100, 1105, 1110, 1200, 1250, 1282, 1450, 1512, 1604, 1605, 1606, 1610, 1615, 1620, 1650, 1710, 1711, 1712, 1806, 1810, 1811, 1812, 1912, 1914.