
|
PLEASE PATRONIZE OUR SPONSORS!


|
|||||||
 |
|
|
Thread Tools | Display Modes |
|
#1
 03-12-2010, 10:42 PM
|
|||
|
|||
|
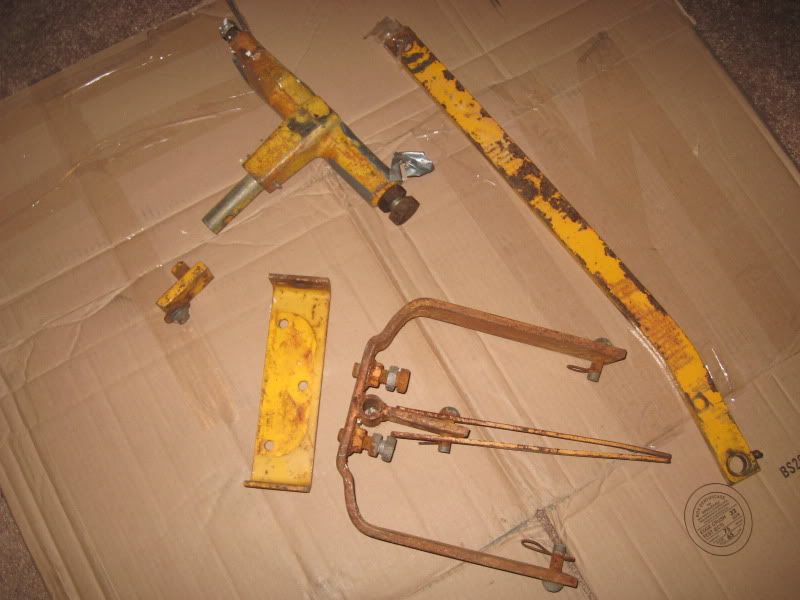
O.K. I recently purchased a sleeve hitch setup for a wide frame cub with brinly hitch. I know some of the parts will work but I am not sure about others? The lift bar is the wrong one but the measurments are the same between holes. As far as I can tell the only difference is the bend? I am also unsure what the small plate ataches to? Any help and pictures would help me greatly. I have a 1982 782 with cast rear end and hydrolic lift if that helps.

|
|
#2
03-13-2010, 09:24 AM
|
||||
|
||||
|
FWIW
I did the same instillation on my 782. I used the curved bar, but I experience that the lift pin in the sleeve (the one that does the lifting) goes too high, hitting on the sheet metal right @ the IH decal. It raises the fender assy about 3/4". So that told me that the center to center holes are a little longer on the curved bar versus the straight bar. I plan to just shorten up this measurement by welding the hole shut and re drilling closer together. At present, I don't need the hitch so it isn't a priority. I made a pin to attach the bar to the hyd cyl. Also I had to remove the zerk fitting as it caused an interference problem. The square metal with the pin in it, will not be needed as it is replaced with existing cylinder pin ( in my case the one I made) this is just how I did mine.
|
|
#3
03-14-2010, 08:58 PM
|
|||
|
|||
|
Thanks for the info. I will try out the lift bar I have and see how it works. The pin idea looks like it shoud work well. I will try to make something similer.
|
|
#4
03-15-2010, 01:33 AM
|
||||
|
||||
|
If you use that lift bar, I can almost guarantee you're going to put a big dent in your fenders. The correct lift bar is just a straight piece of steel with 2 holes drilled in it, one with a counterbore. I might have dimensions around here somewhere...
|
|
#5
03-15-2010, 01:55 PM
|
|||
|
|||
|
Im in the pracess of fabing up my own lift, and have been told the lift bar is 27" with a 25" center too center hole spacing my last thing to do then weld the arm into position, my thing is these 782 dont seem to have much lift travel and was looking at a deere cyclinder that has another approx 1 1/2" of lift but havent looked into what other issues that could create. pictures too follow.
|
|
#7
03-15-2010, 03:09 PM
|
||||
|
||||
|
I'm with Matt, on the plenty of travel,
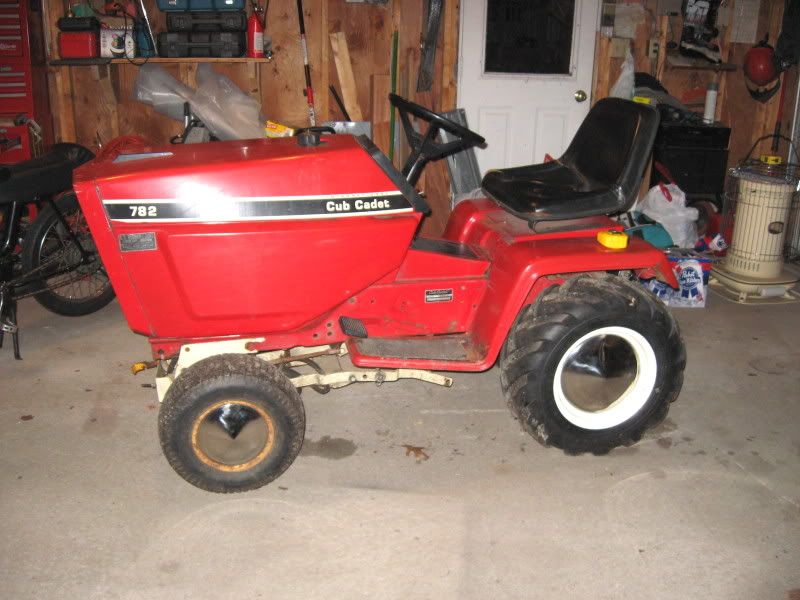
Attached is a pix with the lift in the down position on my 782. You can compare that to the previous post of it in the up position. I would think it is sufficient movement.
|
|
#8
03-15-2010, 10:12 PM
|
|||
|
|||
|
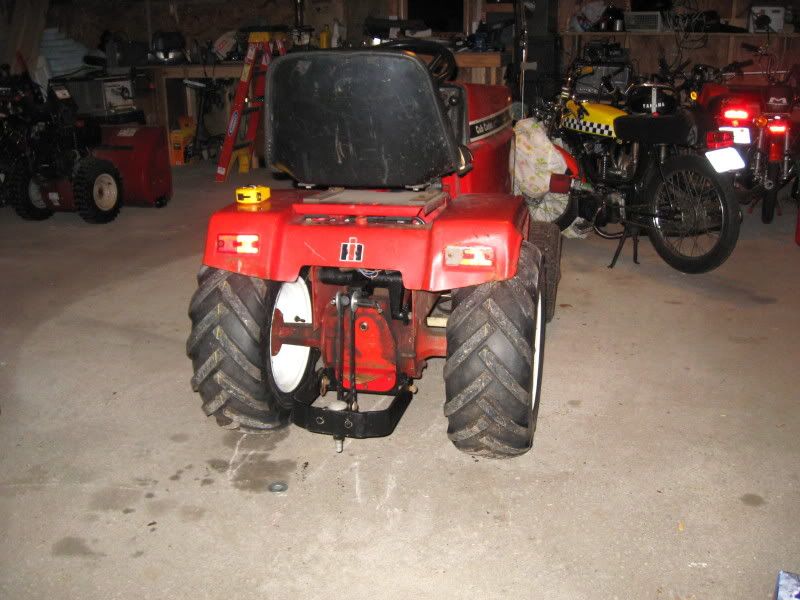
Well I used the lift bar I have and it does hit the rear. I'm not against notching the body to make it work. This is a low budget setup and not a show tractor so it will work fine for me. I was pretty happy with the amount of lift it gives you. I think it will give me plenty of lift for my rear bucket project I am planning. Here are a few pics with the sleeve hitch installed and the rear rims painted with the new tires. I still got to do the fronts.
|
|
#9
03-15-2010, 10:46 PM
|
||||
|
||||
|
Do as you like, it's your ride, but on mine, I will shorten the Center to center distance. Just a guess off the top of my head, it can't be more than 1/2"
or so. Over the years and restoring everything that I have, so many times I have cussed previous folks handi work as well as my own, in my younger days. If it just takes a little work I take the time. It hurts when I realise all the things I cobbled or threw away or scrapped that are prized treasures today. I have modified my 782 with the addition of power steering but not so much as can't be restored to origional with just bolt back on parts. ----Just an ol boys take on things.
|
|
#10
03-15-2010, 11:55 PM
|
|||
|
|||
|
I'm in agreement with others....nothing worse than a hack job.
Scott
|
|
|
|
Cub Cadet is a premium line of outdoor power equipment, established in 1961 as part of International Harvester. During the 1960s, IH initiated an entirely new line of lawn and garden equipment aimed at the owners rural homes with large yards and private gardens. There were a wide variety of Cub Cadet branded and after-market attachments available; including mowers, blades, snow blowers, front loaders, plows, carts, etc. Cub Cadet advertising at that time harped on their thorough testing by "boys - acknowledged by many as the world's worst destructive force!". Cub Cadets became known for their dependability and rugged construction.
MTD Products, Inc. of Cleveland, Ohio purchased the Cub Cadet brand from International Harvester in 1981. Cub Cadet was held as a wholly owned subsidiary for many years following this acquisition, which allowed them to operate independently. Recently, MTD has taken a more aggressive role and integrated Cub Cadet into its other lines of power equipment.
This website and forum are not affiliated with or sponsored by MTD Products Inc, which owns the CUB CADET trademarks. It is not an official MTD Products Inc, website, and MTD Products Inc, is not responsible for any of its content. The official MTD Products Inc, website can be found at: http://www.mtdproducts.com. The information and opinions expressed on this website are the responsibility of the website's owner and/or it's members, and do not represent the opinions of MTD Products Inc. IH, INTERNATIONAL HARVESTER are registered trademark of CNH America LLC
All material, images, and graphics from this site are the property of www.onlycubcadets.net. Any unauthorized use, reproductions, or duplications are prohibited unless solely expressed in writing.
Cub Cadet, Cub, Cadet, IH, MTD, Parts, Tractors, Tractor, International Harvester, Lawn, Garden, Lawn Mower, Kohler, garden tractor equipment, lawn garden tractors, antique garden tractors, garden tractor, PTO, parts, online, Original, 70, 71, 72, 73, 76, SO76, 80, 81, 86, 100, 102, 104, 105, 106, 107, 108,109, 122, 123, 124, 125, 126, 127, 128, 129, 147, 149, 169, 182, 282, 382, 482, 580, 582, 582 Special, 680, 682, 782, 782D, 784, 800, 805, 882, 982, 984, 986, 1000, 1015, 1100, 1105, 1110, 1200, 1250, 1282, 1450, 1512, 1604, 1605, 1606, 1610, 1615, 1620, 1650, 1710, 1711, 1712, 1806, 1810, 1811, 1812, 1912, 1914.


 Linear Mode

